

The Making of "The Flood"
By: Loredana Papp
In this tutorial you will use some pretty simple Photoshop techniques to blend different images that normally don't match (like the dry soil cracks and the sea) into a beautiful and dramatic surreal composition. Let's get started!

Getting the stock-images
The most important thing in a landscape photo manipulation is the right stock, so pick them carefully! I've chosen the following stock:
- Turtle from manaphoto-stock
- Sand Castle 1 from misskayastock
- Sand Castle 2 from misskayastock
- Sky 1 by ZaNuDa
- Sky 2 from personal resources
- Sky 3 from causticstock
- Sky 4 from flordelys-stock
- Sea from ephedrina-stock
- Sand Castle 3 from stock.xchng
- Desert from kjherstin-stock
Step 1
Create a new file and drag in the Turtle picture.

Step 2
Open the Sand Castle 1 image and cut out the castle and the road. I used the Pen Tool. After you cut it out, drag it into the new file. Decrease the image size so it will fit on the turtle's back. Place it like in the image below. Create a mask and erase the bottom part with a basic brush (black color and soft edges).


Step 3
Open the Sand Castle 2 image. Cut it out as you did in Step 2. Decrease its size and place it on the turtle's back as shown.


Step 4
Next, we'll create a bigger castle. Duplicate the layers of the two castles that you have already cut out by pressing Command + J on the layer you want to duplicate. Decrease the images size by pressing Command + T. Now flip them horizontally so they won't look strange and place them as you think they should fit.


Step 5
Create a new layer. Use the Clone Stamp Tool to place some sand on the turtle's shell.

Step 6
Now let's create the sky. I used four different pictures to create this sky because I want the result to be unique. You can't achieve that if you use a stock picture just the way you find it. Open the Sky 1 image and place it as shown. Create a mask and erase the bottom edges.

Step 7
Open the second sky image (located in the PSD source file). We only need the skyline from this picture so erase the other parts on the layer mask.

Step 8
Open the Sky 3 image, decrease its size and place it on the left side of the design. Create a mask and erase the parts that don't fit.

Step 9
Open the Sky 4 image and place it to the right. We only need the skyline from this one too so erase the rest with the mask.

Step 10
Create a new layer. Select a basic brush with smooth edges (black color) and start drawing some lines on the sand at the turtle's edges. Then go to Filter > Blur > Gaussian Blur (Radius 7px), and then set the layer Opacity to about 30-40%.

Step 11
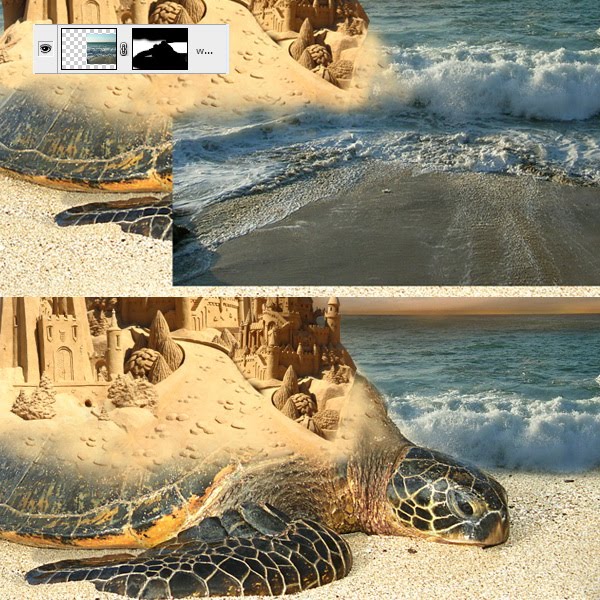
Open the Sea image. Drag it into the file and decrease its size. Duplicate the layer by pressing Command + J. Place the first layer at the right of the turtle and the second layer at the left. Create a mask for both layers and erase the parts that we don't need, as shown below.
Step 12
Open an image of Sand Castle 3, then drag it in and flip it horizontally (Edit > Transform > Flip Horizontally). Place it so the sand castle would be on top of the turtle's shell. Decrease the opacity of the photo so you will see where to place it.
Now that the image is placed correctly increase its opacity back to 100% and create a mask for this layer. Erase all the sand that is not on the shell. Now create a clipping mask by pressing Alt and going to the Adjustment Layers > Hue/Saturation, then set it as Hue: +5, Saturation:+20, and Lightness: +5.

Step 13
Now drag the Desert photo in and erase in the mask the parts on the turtle and the sea. Set the blending mode to Multiply.

Step 14
Create two clipping masks. For the first clipping mask go to Adjustment Layers > Levels with the next input levels: 24 , 1,00 and 189. For the second clipping mask go to Adjustment Layers > Hue/Saturation, and set Hue at 0, Saturation at -41, and Lightness at 0.

Step 15
Open the Sea picture. Place it at the back of the turtle, like you see below. Open the same picture again and place it to the left of the turtle. Create a layer mask and start erasing the parts we don't need as shown.


Step 16
Now let's play a bit with the colors to create a dramatic atmosphere. Go to the Adjustment Layers > Levels with the next input levels: 22, 1,00 and 239.

Step 17
Go to Adjustment Layers > Color Balance, then set the color levels to: +9, 0, and -26.

Step 18
Go to Adjustment Layers > Gradient map, and follow the settings below. Also, set the Opacity to 60%.

Step 19
Go to Adjustment Layers > Color Balance. Set the color levels to: -18, 0, and -7.

Step 20
Go to Adjustment Layers > Photo Filter. Set the the Density to 50%.

Step 21
Create a new layer, then use a basic brush with smooth edges to paint the turtle's eye. This is a minor fix but it makes it look better.

Step 22
Go to Adjustment Layers > Hue/Saturation, and use the following settings: Hue of 0, Saturation of +100, and Lightness of 0. Set the Opacity to 26%. Apply this on the turtle's right sides where the light comes from. Do it just like you see in the image of the layer's mask.

Step 23
Go to Adjustment Layers > Curves and use the settings below.

Step 24
Go to Adjustment Layers > Gradient Map. Use the settings shown below. Then set the Opacity to 50%.

Step 25
Next go to Filters > Other > High Pass. Set the radius to 7, 0. Set the blending mode to Hard Light. Erase the edges on the layer mask so only the middle of the image stays sharp.

Step 26
Go to Adjustment Layers > Curves. Use the settings shown below: Output is 56 and Input is 99.

Step 27
Now this is the last filter we are applying. Go to Adjustment Layers > Photo Filter. Set the the Density to 25% so the atmosphere will look warmer.

Step 28
Apply some splashes where the water hits the turtle. Do it with a customized brush.

Conclusion
Sit back and take a look at your finished surreal photo manipulation!

Create a Breaking Apart Effect on the Dark Side
This tutorial one of the PSDtuts PLUS tutorials
Download the PSD for this tutorial
Before we get started, let's take a look at the image we'll be creating. Want access to full PSD files and downloadable copies of every tutorial, including this one? Join PSDTUTS PLUS for just $9/month.

Step 1
Open your image that you would like to break apart. I have here an image of a man's face, which we'll use as a working sample. Choose the Polygonal Lasso tool (L), or any selection tool you’re comfortable with. Draw a selection around the face, hand, and shirt, to isolated them from the background. Press Command + J for Layer Via Copy command, then rename it to "Face 01."

Step 2
Right-click on your layer, choose Convert to Smart Object command, then double-click on your Smart Object layer. From the Adjustment Layer choose Hue/Saturation command, set the Saturation value to -100, then select the Brush tool (B) and make sure your foreground color is set to black. Also, make sure your Hue/Saturation Layer mask is active, draw with it around the face and whole skin. This well apply the command just on the shirt. Press Command + W to close the Smart Object, click Yes when you are asked and save.

Step 3
Open a Rock texture image.

Step 4
Drag the texture into your composition. Set the blend mode of the layer to Pin Light, and rename it to "Crack 01." Move the texture layer into a suitable position, as shown below.

Step 5
Open another rock texture image, drag it into your composition, and place it under the "Face 01" Layer. Rename it "Rock tex."

Step 6
With the Layer "Rock tex" selected, press Command + Alt + Shift + N to make a new layer above it. Name it "Color" and fill the new Layer with a skin tone (#d39f7e), then set the Blend Mode to Color.

Step 7
Open another rock texture image. We will use this one as a background for our composition. Name it "background," and place it under the "face 01" Layer. Next, hold down the Command key and click on the "face 01" Layer to load selection from it.
With the "background" layer selected, click on the Add Layer Mask button. Also, make sure your Layer Mask is highlighted and press Command + I to invert the Mask. Right-click on the layer and choose the Convert to Smart Object command.
Go to Filter > Blur > Surface Blur, and set the Radius value to 100 and Threshold to 20. Click OK to apply the filter. Then go to Filter > Render > Lighting Effects and set it as shown below. Double-click on the little sliders that appear next to Lighting effects filter to view the Blending Options for Lighting Effects, and set the Mode to Multiply.

Step 8
Choose the Polygonal Lasso tool (L), and with the Layer "face 01" selected, draw a selection as shown below. Next, press Command + J to duplicate the selected area and name this Layer "Face break." Add a Layer Mask to the Layer "face 01," then hold down the Command key and click on the thumbnail of the layer "face break." Next, fill the selected area with black on the Layer Mask. Select the Layer "face break," hold down Command, and move it a little to see underneath it.

Step 9
Draw a selection around the lower part of the face, and press Command + J to copy it into a new Layer, then name this Layer "Chin." Click on the Layer Mask next to the Layer "face 01," hold down the Command key, and click on the thumbnail of the "Chin" layer. Next, fill the selection with black. Move the "Chin" and "face break" on top of the other layers.

Step 10
Hold down Alt key and click on the Eye next to the "Crack 01" Layer to hide all the layers except it. Next, go to Select > Color Range, select the black area, then set the Fuzziness to 125, and click OK to apply. Click on the Add Layer Mask button. Alt-click on the Eye icon to show all other layers.

Step 11
Select the Layer "face 01" and press Command + Alt + Shift + N to make a new Layer above it, name it "Shadows Soft Light" and change the Blend mode to "Soft Light." Choose a Brush tool (B) and with black paint on the lifted area in your composition. Next, lower the Opacity of your brush to 50% and draw on the rock texture that appears underneath the ski,n as shown below. This will hide the line that appears after isolate the image from the background, and add some depth to your texture.

Step 12
Select the "face break" Layer and press Command + J to duplicated, then click on the eye next to the "face break" layer to hide it. Rename the new layer "Basic Breaking," then choose Lasso tool (L). Next, draw a small selection around any are you want to break off. Hold down the Command key and move the piece to the right side. Repeat this procedure multiple times until you have the same effect as shown below.

Step 13
Choose the "Chin" Layer, then press Command + T for the Free Transform command and rotate it. Next, add a Drop Shadow effect set to the value you desire.

Step 14
Return to "Basic Breaking" layer, press Command + J to duplicate it, then click on the eye next to "Basic Breaking" layer to hide it. Rename the new layer "Advanced Breaking," then draw a selection around each piece and move them to the right.
Now divide them into more smaller pieces making sure the pieces get smaller as they move to your right side. Next, go to Filter > Distort > Spherize, and set the Amount value to 100%, then click OK to apply the Filter. Go to the "Chin" layer and right-click on it, and choose Copy Layer Style. Right-click on the "Advanced Breaking" layer and choose Paste Layer Style.

Step 15
Go to the "Crack 01" layer, highlight the layer mask. Press (B) for the Brush tool and paint with Black on the neck. We don’t want the effect to extend to the neck or shirt.

Step 16
Now make a several copies of the "Crack 01" layer. Adjust their placement and shape, Modify them with Free Transform, and edit their Masks so we could take a piece from the eye.

Step 17
Select the "face 01" layer and draw a selection around the eye. Press Command + J to duplicate it, name it "Eye." Select the Layer Mask of the "face 01" layer, hold down the Command key and click on the "Eye" Layer to load a selection form it, then fill it with black.

Step 18
Select the "Crack 01" Layer Mask, then draw with black using the Brush tool (B), as shown below.

Step 19
Go to the "Rock tex" layer and press Command + J to Duplicate it. Next, press O for Burn tool and set the exposure to 100%. Draw in the place where the eye was, as shown below.

Step 20
Go to the "eye" Layer and draw some selections with the Lasso tool (L) to take little pieces from it. Move them away a little bit. Copy and Paste the same Drop Shadow effect on it.

Step 21
Go to the "Rock tex" layer, move it on top of all the other layers, set the Blend Mode to "Overlay" and Opacity to 37%. Next, click on the Add Layer Mask button. Go to the "face 01" Layer and Command-click on the thumbnail of the Layer to load a selection. With lasso tool (L) selected, hold down the Alt key and subtract from the selection until just the Shirt remains selected. Go to the "Rock tex" Layer mask and fill it with black, as shown below.

Step 22
Add a Levels Adjustment layer on top of all layers, and enter the values shown below.

Step 23
Add a Hue/Saturation Adjustment layer on top of all, and enter -30 for the Saturation.

Conclusion
Creating a breaking apart effect is easier than it looks, but it takes time. I hope that you enjoyed this tutorial and learned something from it.
