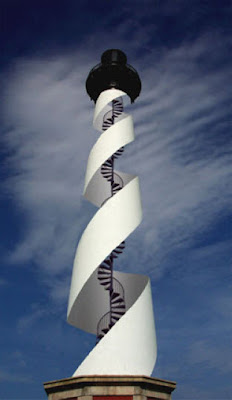
Hollow tower
اسم المصمم
c1010010
I've broken the process down into four general stages; Erase, Replace, Insert and Convert.
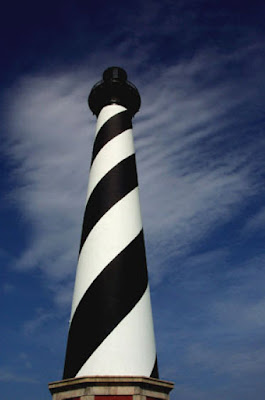
In the first stage, Erase, you will remove the black stripe from around the lighthouse... allowing you to reveal the insides and/or whatever is behind.
In the second stage, Replace, you will let the clouds blow in to show what it looks like behind the lighthouse. You will also add the missing portions of the spiral white stripe.
In stage three, Insert, you will add the spiral staircase to the inside of the lighthouse.
Step 1: Erase
First, duplicate your background layer by dragging the the "Background" layer to the "Create a new layer" icon at the bottom of your Layers palette..
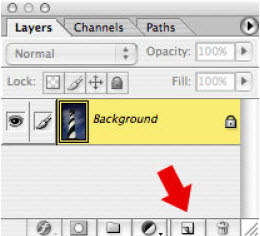
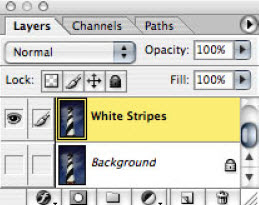
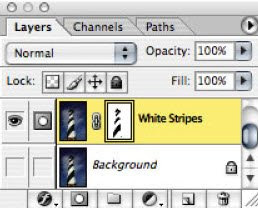
You never want to work with your original image layer... never. So, duplicate it and name it White Stripes. Turn off visibility on the Background layer, and select the White Stripes layer
We can cheat a little here and use the Magic Wand to help with our selection. Select the Magic Wand Tool and set the options like so

Now, begin by selecting the big black stripe at the bottom of the lighthouse. Once that is selected, hold down the Shift key and select the other black stripes. (Don't forget the little bit at the bottom right, at the base.) Also, there is no need to worry about the Magic Wand grabbing the top of the lighthouse... we'll fix that in a second
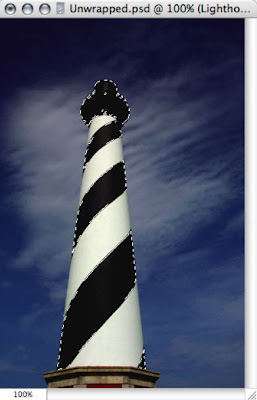
Now, we are going to make a layer mask, but we want to mask everything BUT the stuff we just selected. So, invert your selection
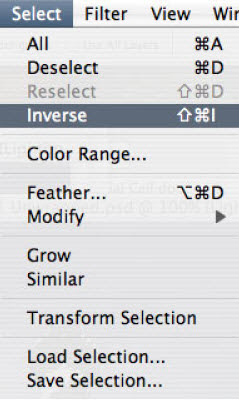
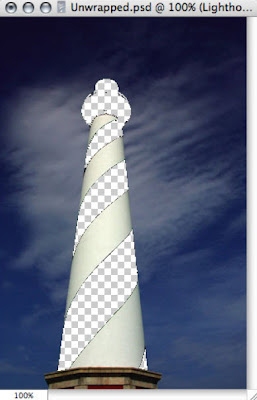
You should end up with a selection that looks like this

Now, create a layer mask by selecting "Add Layer Mask" from your Layers palette. You will get a linked layer mask in your White Stripes layer
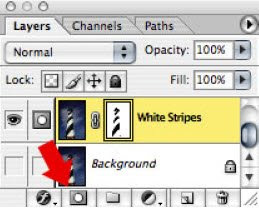
You will then see that your White Stripes layer now has "holes" punched where the black stripes used to be. You've just masked them out of the image, but the image data is still there... just no longer visible
Now, with the White Stripes layer mask selected
select the Brush Tool and set it's options to a small hard-edge brush
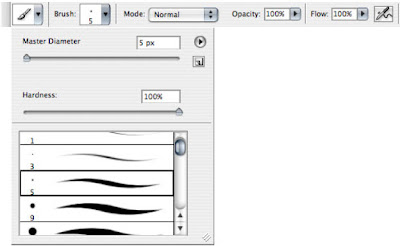
Select a foreground color to 100% black and begin brushing black into your layer mask. The effect of black on a layer mask is to make the mask 100% opaque or 100% masking the image. (Conversely, 100% white will make the mask 100% transparent or unmasking the image. Grey will get you something in between... it all depends on how black or white the color you are using on your brush.)
It will look like you are erasing part of the image... you're not, it's just being hidden by the mask.
Begin to clean up the boundary line between the white stripes and what was the black stripe. It would be very helpful to zoom in a little. Don't worry about the boundary line between the sky and the black line just now, we'll get to that shortly. What you should end up with is a clean, hard edge at the white stripe
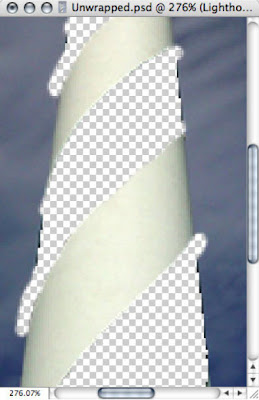
Now, begin to clean up the boundary line between the sky and the black line. Since we are dealing with fluffy, wispy clouds we do not want a hard edge here. So, select a brush with 0% hardness
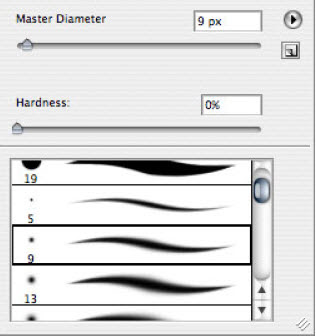 and begin to erase the sides of the black stripes. Don't be cheap, really push the edge out. We want the clouds to blend in, and we're going to need a little space to do that
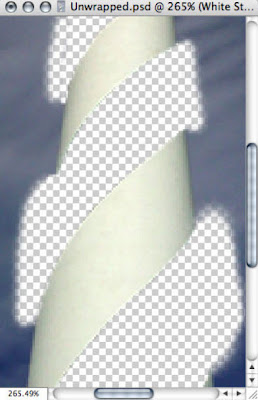
Now, we've got to deal with the top of the lighthouse. Remember the Magic Wand selected it as well? Change your foreground color to 100% white and go grab a small hard-edged brush. With your White Stripes layer mask still selected, brush white at the top of the lighthouse to make the layer mask transparent. The top will reappear
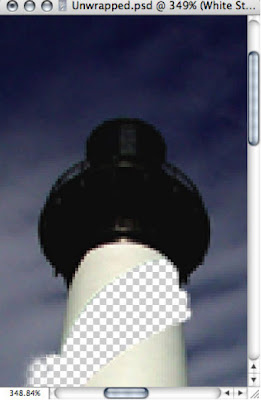
Ok, so at this point you should be finished with the Erase stage and your image should look a little something like this
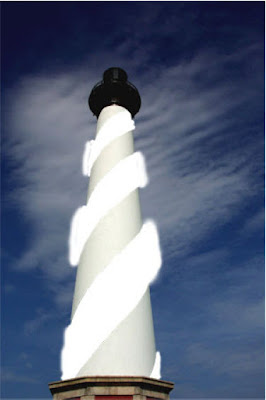
Tip: Never work on your original background layer.
Tip: Always use a layer mask when hiding image data on a layer.
Tip: When painting on a mask, 100% black = 100% opaque, 0% black (a.k.a. white) = 0% opaque (a.k.a. fully transparent)
Step 2: Replace
Now, we are going to begin to bring in the background clouds. To do this, first we want to create a new layer which will accept our cloned clouds. You always want to have your cloned data stored on a new layer. This way, if you have issues later, you can undo it without destroying your entire image.
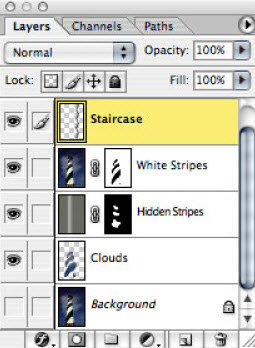
Click the Create a new layer button on your Layers Palette and name the new layer Clouds. Re-order your layers by dragging the new Clouds layer below your White Stripes layer. The reason we are doing this re-order is because we only want the clouds to show through in the "holes" in the mask we just created; not on top of the white stripes. Your Layers Palette should look something like this
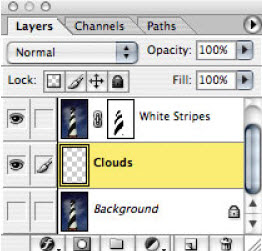
Zoom in so that you can see decent detail. With your new "Clouds" layer selected, select the "Clone Stamp Tool", grab a medium sized soft-edged brush and set the options to

Now, Option-Click on part of the clouds to define the source for your clone. Begin to clone the clouds from the source point to the new Clouds layer. Watch the colors and textures you are cloning... blend; you want to make the transitions as smooth and subtle as possible. Pay closest attention to the boundary lines, because that is where people's eyes will first jump
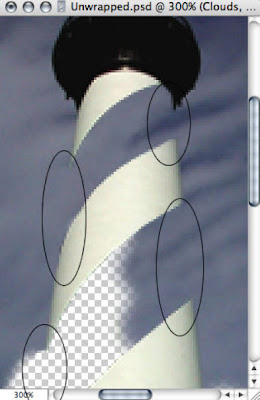
For example, the clouds seem to have "fingers" of white and blue towards the upper right. If you make the "fingers" extend past the boundary convincingly the transition will look best. It may take some time to get it right. Spend the time... don't cheat
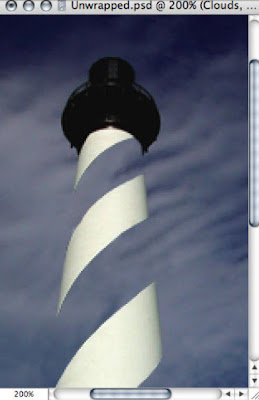
You will most definitely need to re-define source points quite a few times for this step. To best match color and texture, you will want to work in from both sides of the lighthouse. So, for the left side of one of the stripes, you will want to the pull clouds from the left side relatively close to the area you want to fill in. For the right side... pull from the right side. In the middle you will have a rather harsh boundary line where the left and right clone data touches. Just continue to blend that boundary line with the clone tool using similar colors. I zoom in and out frequently to get different perspectives on the work. If you can tell where the "real" clouds and the newly cloned clouds meet... you are not done
yet.
You should end up with something like this when your are done
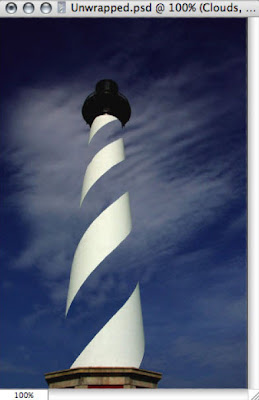
Now, it's time to add in the remaining part of the white spiral. If you think about it, the only part of the white stripes that we want used to be covered by the black stripe.
Create a new layer and name the it Hidden Stripes. Re-order your layers so that the Hidden Stripes layer is between the Clouds layer and the White Stripes layer
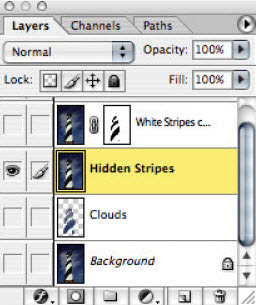
With your Hidden Stripes layer selected, grab the Gradient tool. It's a sub-selection under the Paint Bucket tool. Just click and hold, and a menu should pop up

Look at the white stripes on the lighthouse... they are dark on the edges, light in the middle. This gives the feeling of depth. Since you already know the general shape of a lighthouse (cylinder or cone), this feeling of depth translates (in your head) to round. We want to have this same feeling for the parts of the white stripe we have to create.
Select a foreground color close to (but a little darker than) the middle of the white stripes. Then, select a background color close to (but a little darker than) the very edge of the white stripes. The reason we are choosing colors which are a little darker is because we are dealing with the inside of the lighthouse and the colors will be the same, only darker, inside

Set the Gradient tool options like this

Pay close attention to the type of gradient selected. The fourth option available, Reflected Gradient.
With the Hidden Stripes layer selected, and your Gradient Tool selected, click and drag from the center of the lighthouse outwards to about the edge. Hold down the Shift key while dragging as this will allow you to constrain the line to the horizontal plane. This will force the "line" of the gradient to match the direction of the lighthouse itself. When you let go, you will have a nice smooth gradient from light grey to dark grey underneath the existing white stripe. It will bleed over a bit, but don't worry about that for now
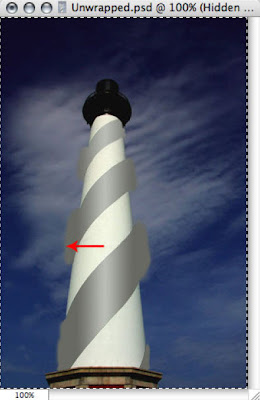
If the colors are not right, change them and just draw a gradient over and over until it seems to fit in nicely.
Now, with the Hidden Stripes layer still selected, create a layer mask and fill it with 100% black. Your gradient will disappear, but that's OK, we only want it to appear in very specific locations
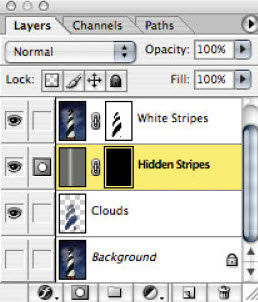
With the layer mask of the Hidden Stripes layer selected, grab a hard-edged large-ish 100% white brush. Begin "painting in" (really unmasking the gradient you created before) the back white stripe. Since the gradient is already there it looks as if the stripe has depth to it. If you need to, change between 100% black and 100% white to remove and add to your image. Because you have been using masks on other layers, and are painting into a lower layer things end up looking pretty nice
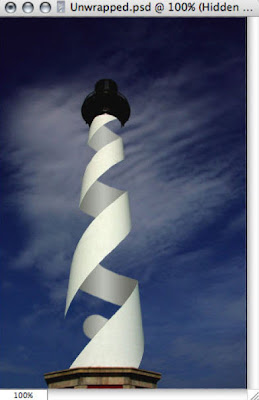
Just for grins, you can move your Hidden Stripes layer to the top to see just how sloppy you were. But, since you were doing things on a lower layer... it does not matter
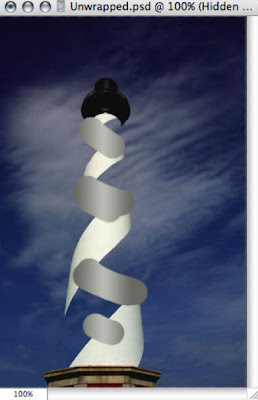
Ok, enough of that. Back to work. Put your Hidden Stripes layer back between White Stripes and Clouds.
When you are done any touch ups, you should end up with a nice looking, contiguous, white spiral; you are done with the Replace stage
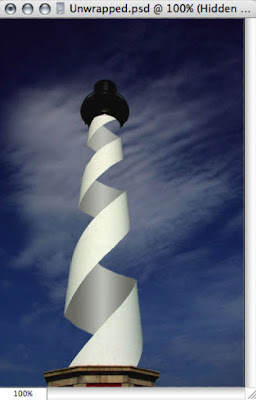
Tip: Always clone to a new layer.
Tip: Take advantage of layers and masks you already have in your image. There is no need to waste time and detail on hidden parts of the image that you will never see.
Step 3: Insert
It's now time to start working on the long spiral staircase that will end up in the middle of the lighthouse. (Yes, I know a real lighthouse would not have a single spiral staircase in the middle like this. They are not invisible either.)
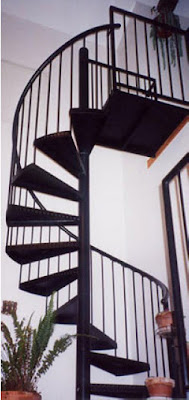
Jump over to your spiral staircase source. Since we are going to be shrinking this down pretty substantially to make it fit into the lighthouse, you can be a little less than perfect at this point... i.e. cut some corners. (If you really want to be hard-core about it, take our time here and select things carefully by hand. I didn't... and I won.)
Grab the Magic Wand tool, set the tolerance to 64 and click on the black portions of the staircase. (You will have to play around with the tolerance value for things like this... if you are not getting enough selected, increase the tolerance, deselect, and try again. If you are getting too much, decrease the tolerance, deselect, and try again. For some reason I have a liking for powers of 2. Can't explain it, I just do, OK?) You should end up with a selection like this
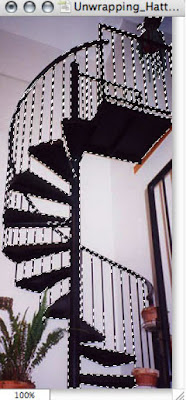
Copy your selection and paste it into your Lighthouse document. Rename the new layer Staircase and move it to the very top of your layer stack. It's going to look pretty rough at this point, but that's OK for now
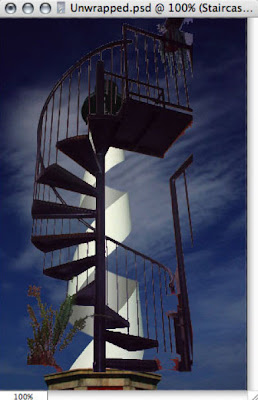
Create a layer mask for your Staircase layer and mask out the portions of the image we will not need. Really, all we are looking for here is 1/2 turn. So continue masking till you've got a decent 1/2 turn of the stairs. It will be much easier to work with if we shrink the size of this turn a bit. So, with the "Staircase" layer selected, Edit>Transform>Scale to about 50% size
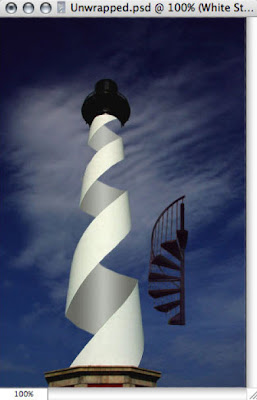
Now, it's time to start building the complete staircase. Select your "Staircase" layer and duplicate it. It will automatically be named Staircase Copy, that's fine for now. Since we only have 1/2 a turn so far, we need to work on the other 1/2 of the turn. Do an Edit>Transform>Flip Horizontal on Staircase Copy. Move it around a bit so that the central post and hand rail of the staircase match up. You may need do to a little bit of mask clean up here. What you should end up with is a pretty convincing looking full turn of a spiral staircase
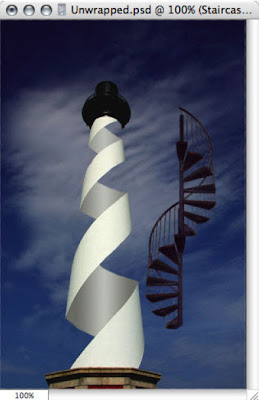
Now, if you've been saving lots in the past, we're about do something that is not easily undoable. At points like these, I like to save a new version of my document, so if I ever have to go back, I can.
With the highest Staircase layer selected, select Layer>Merge Down. Essentially merging Staircase Copy and Staircase into a single layer called Staircase. It will ask you if you want to Preserve or Apply the layer mask. You want to select Apply. You are now left with a layer, Staircase, with one complete turn of a spiral staircase. Edit>Transform>Scale an additional 50% so that you have some room to work.
You should then have a complete spiral staircase, ready for insertion
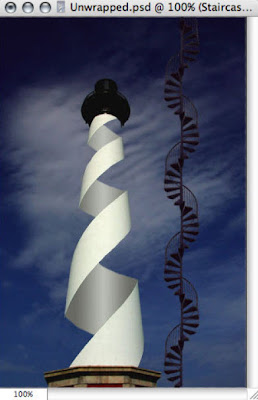
Now position your Staircase layer on top of the lighthouse. Use Edit>Transform>Scale so shrink and squash the staircase a little so that it looks like it would fit inside.
Use Edit>Transform>Perspective to pinch the top and widen the base of the staircase so that it looks like it actually has some perspective and appears to get smaller as it goes up. Tweak and adjust things till it looks right to your eye
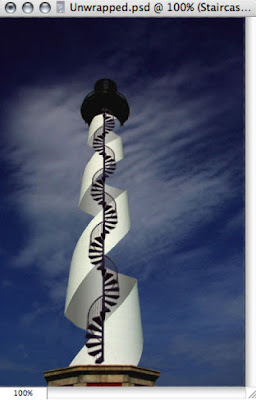
Now it's time to re-order your layers so the staircase appears to be inside the lighthouse. Move Staircase between White Stripes and Hidden Stripes.
And you are now done with the Insert stage
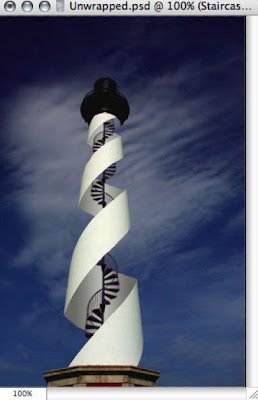
Tip: Make use of perspective and scale. It's easy for people to notice when something "just looks off" in an image.
Step 4: Convert
It's time now to step back and look at the image as a whole. More often than not, a 'chopped image is too clean. For instance, the Hidden Stripes layer is just too smooth and even for me. It needs to be lighted a little differently, maybe some noise, etc. This is purely personal taste.
For my image, I chose to run the Filter>Render>Lighting Effects filter. The sun in the original image appears to be coming from the upper left... so you want to mimic that with the filter.
I also chose to run the Filter>Noise>Add Noise to add 1% of noise to the gradient. Then, after a quick use of Filter>Blur>Gaussian Blur things started to look a little more like I was imagining.
Finally you will want to size, crop and convert your image to JPG for posting. (See, I told you I would get convert in there somewhere.)
And you are now done with the Covert stage... and with your final image as well
Conclusion
There are many ways to achieve the same goal... this was mine. I hope you found this tutorial useful and easy to follow.
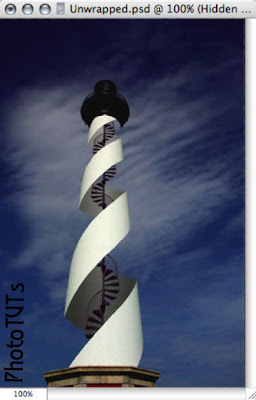 That's end..


Post a Comment