Create a Breaking Apart Effect on the Dark Side
This tutorial one of the PSDtuts PLUS tutorials
Download the PSD for this tutorial
Before we get started, let's take a look at the image we'll be creating. Want access to full PSD files and downloadable copies of every tutorial, including this one? Join PSDTUTS PLUS for just $9/month.

Step 1
Open your image that you would like to break apart. I have here an image of a man's face, which we'll use as a working sample. Choose the Polygonal Lasso tool (L), or any selection tool you’re comfortable with. Draw a selection around the face, hand, and shirt, to isolated them from the background. Press Command + J for Layer Via Copy command, then rename it to "Face 01."

Step 2
Right-click on your layer, choose Convert to Smart Object command, then double-click on your Smart Object layer. From the Adjustment Layer choose Hue/Saturation command, set the Saturation value to -100, then select the Brush tool (B) and make sure your foreground color is set to black. Also, make sure your Hue/Saturation Layer mask is active, draw with it around the face and whole skin. This well apply the command just on the shirt. Press Command + W to close the Smart Object, click Yes when you are asked and save.

Step 3
Open a Rock texture image.

Step 4
Drag the texture into your composition. Set the blend mode of the layer to Pin Light, and rename it to "Crack 01." Move the texture layer into a suitable position, as shown below.

Step 5
Open another rock texture image, drag it into your composition, and place it under the "Face 01" Layer. Rename it "Rock tex."

Step 6
With the Layer "Rock tex" selected, press Command + Alt + Shift + N to make a new layer above it. Name it "Color" and fill the new Layer with a skin tone (#d39f7e), then set the Blend Mode to Color.

Step 7
Open another rock texture image. We will use this one as a background for our composition. Name it "background," and place it under the "face 01" Layer. Next, hold down the Command key and click on the "face 01" Layer to load selection from it.
With the "background" layer selected, click on the Add Layer Mask button. Also, make sure your Layer Mask is highlighted and press Command + I to invert the Mask. Right-click on the layer and choose the Convert to Smart Object command.
Go to Filter > Blur > Surface Blur, and set the Radius value to 100 and Threshold to 20. Click OK to apply the filter. Then go to Filter > Render > Lighting Effects and set it as shown below. Double-click on the little sliders that appear next to Lighting effects filter to view the Blending Options for Lighting Effects, and set the Mode to Multiply.

Step 8
Choose the Polygonal Lasso tool (L), and with the Layer "face 01" selected, draw a selection as shown below. Next, press Command + J to duplicate the selected area and name this Layer "Face break." Add a Layer Mask to the Layer "face 01," then hold down the Command key and click on the thumbnail of the layer "face break." Next, fill the selected area with black on the Layer Mask. Select the Layer "face break," hold down Command, and move it a little to see underneath it.

Step 9
Draw a selection around the lower part of the face, and press Command + J to copy it into a new Layer, then name this Layer "Chin." Click on the Layer Mask next to the Layer "face 01," hold down the Command key, and click on the thumbnail of the "Chin" layer. Next, fill the selection with black. Move the "Chin" and "face break" on top of the other layers.

Step 10
Hold down Alt key and click on the Eye next to the "Crack 01" Layer to hide all the layers except it. Next, go to Select > Color Range, select the black area, then set the Fuzziness to 125, and click OK to apply. Click on the Add Layer Mask button. Alt-click on the Eye icon to show all other layers.

Step 11
Select the Layer "face 01" and press Command + Alt + Shift + N to make a new Layer above it, name it "Shadows Soft Light" and change the Blend mode to "Soft Light." Choose a Brush tool (B) and with black paint on the lifted area in your composition. Next, lower the Opacity of your brush to 50% and draw on the rock texture that appears underneath the ski,n as shown below. This will hide the line that appears after isolate the image from the background, and add some depth to your texture.

Step 12
Select the "face break" Layer and press Command + J to duplicated, then click on the eye next to the "face break" layer to hide it. Rename the new layer "Basic Breaking," then choose Lasso tool (L). Next, draw a small selection around any are you want to break off. Hold down the Command key and move the piece to the right side. Repeat this procedure multiple times until you have the same effect as shown below.

Step 13
Choose the "Chin" Layer, then press Command + T for the Free Transform command and rotate it. Next, add a Drop Shadow effect set to the value you desire.

Step 14
Return to "Basic Breaking" layer, press Command + J to duplicate it, then click on the eye next to "Basic Breaking" layer to hide it. Rename the new layer "Advanced Breaking," then draw a selection around each piece and move them to the right.
Now divide them into more smaller pieces making sure the pieces get smaller as they move to your right side. Next, go to Filter > Distort > Spherize, and set the Amount value to 100%, then click OK to apply the Filter. Go to the "Chin" layer and right-click on it, and choose Copy Layer Style. Right-click on the "Advanced Breaking" layer and choose Paste Layer Style.

Step 15
Go to the "Crack 01" layer, highlight the layer mask. Press (B) for the Brush tool and paint with Black on the neck. We don’t want the effect to extend to the neck or shirt.

Step 16
Now make a several copies of the "Crack 01" layer. Adjust their placement and shape, Modify them with Free Transform, and edit their Masks so we could take a piece from the eye.

Step 17
Select the "face 01" layer and draw a selection around the eye. Press Command + J to duplicate it, name it "Eye." Select the Layer Mask of the "face 01" layer, hold down the Command key and click on the "Eye" Layer to load a selection form it, then fill it with black.

Step 18
Select the "Crack 01" Layer Mask, then draw with black using the Brush tool (B), as shown below.

Step 19
Go to the "Rock tex" layer and press Command + J to Duplicate it. Next, press O for Burn tool and set the exposure to 100%. Draw in the place where the eye was, as shown below.

Step 20
Go to the "eye" Layer and draw some selections with the Lasso tool (L) to take little pieces from it. Move them away a little bit. Copy and Paste the same Drop Shadow effect on it.

Step 21
Go to the "Rock tex" layer, move it on top of all the other layers, set the Blend Mode to "Overlay" and Opacity to 37%. Next, click on the Add Layer Mask button. Go to the "face 01" Layer and Command-click on the thumbnail of the Layer to load a selection. With lasso tool (L) selected, hold down the Alt key and subtract from the selection until just the Shirt remains selected. Go to the "Rock tex" Layer mask and fill it with black, as shown below.

Step 22
Add a Levels Adjustment layer on top of all layers, and enter the values shown below.

Step 23
Add a Hue/Saturation Adjustment layer on top of all, and enter -30 for the Saturation.

Conclusion
Creating a breaking apart effect is easier than it looks, but it takes time. I hope that you enjoyed this tutorial and learned something from it.

Tuesday, April 28, 2009 | 0 Comments
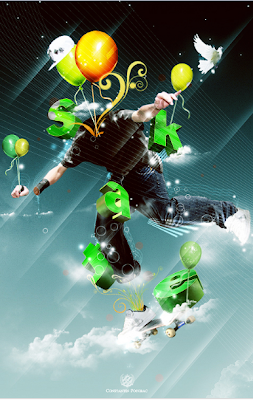
Create a High Flying Skater Illustration
This tutorial one of the PSDtuts PLUS tutorials
Download the PSD for this tutorial
Sunday, April 26, 2009 | 1 Comments
How to Photoshop a Product into a Slick 3d Environment
This tutorial one of the PSDtuts PLUS tutorials
Download the PSD for this tutorial

Download the PDF file which contain the all tutorial..pls click HERE
Monday, April 20, 2009 | 0 Comments
Casting Light on the Creative Retouching Process
Download the PSD for this tutorial
By: JamesZilla
With the western world so preoccupied with looks and beauty, retouching is something that can be seen on a daily basis. Learn to put those skills to better use to create mood, atmosphere, and professional digital art. Let's cast some light on the subject of creative retouching.
Final Image Preview
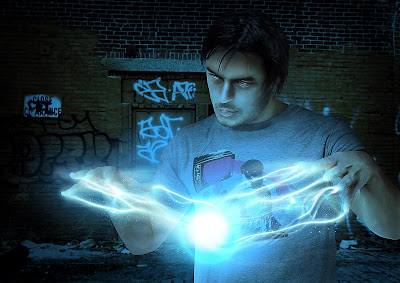
You can find the Photoshop source files in a directory labeled "source" that came in the ZIP file that you downloaded. You may wish to look through them briefly before we begin. A preview of the final image is below. You can view the large version here.
Introduction
The techniques outlined in this tutorial are pretty involving and time consuming. I’d like to tell you that there are magical shortcuts but if you want a rich, atmospheric image then this is definitely a good introduction.
Beauty retouching is very popular in todays society. A more effective use for me is to create mood rather than fake beauty. You could spend tens of hours working on an image before you get it right, though a massive timesaver is shooting your own source imagery. I’ll take you through all of the tricks and techniques I employ, but you’ll need a pretty sound knowledge of Photoshop though as this isn’t for beginners.
Many of the settings, values, brush-strokes described here are open to interpretation. As what may suit one image will need adjusting for another. The key is that you understand what we’re doing and why, then the skills become transferrable. If anyone is interested the man in the image is wearing a Dirty Velvet t-shirt. Their shirts are pretty sweet. See them here
Step 1
Open the Man image (which you can get here) and cut him out from the background. I’m not going to walk you through step by step as there are many methods and variations on how to do this. But I start by duplicating the "Background" Layer and drawing a path using the Pen Tool. Go roughly around the hair, but draw around the bigger clumps of detail
Turn the path into a selection and create a Layer Mask for the Duplicate layer. Create a layer and fill with grey. Put this in between the "Background" and the "Man Duplicate" layers.

Duplicate the "Man Duplicate" layer and position it between the "Man Duplicate" layer and the"Grey" layer. Equip the Smudge Tool with a very fine soft-edged Brush (pick different sizes between 1-3) and set the strength to between 90-98%. Work on the "Man Duplicate copy" layer mask, not the actual layer itself, and begin smudging in hair detail. If you want to use the real image as a guide just reduce the "Grey" layer opacity.

Working on the "Man" layers now. Clone out where you can see the background coming through the hair. Clone hair color underneath the new areas of the Mask on the "Man Duplicate copy" layer.

Finally, add a slight Gaussian Blur (around 0.5 pixels) to the "Man duplicate copy" layer mask. Then apply the Blur Tool to the "Man duplicate" layer mask focusing on the hair areas.

Step 2
Create a new document, I shall refer to this as the Working Document. For the purposes of this tutorial I’m making mine A5 landscape at 300 dpi.

Step 3
I found this background on istockphoto.com. You can get it here or use something similar. Drop it into your Working document. Also drop in the Man cut-outs preserving the Layer masks at this stage. Duplicate the "Man Duplicate copy" layer to strengthen the loose hairs. I’ve flipped and resized to fit the background better.

Step 4
The Man image still had some of the white background reflecting on the edges of the image. I removed these using the clone tool. Set up a soft-edged Paintbrush and pick a source point very close to the areas you’re cloning out.
 After
AfterStep 5
Use the Dodge Tool set to Midtones at an Exposure of 11% to reveal some of the detail in the Iris on the "Man" layer.

Step 6
At this point run a Smart Sharpen over the top "Man" layer and then merge the "Man" layers into one.
 Smart Sharpen
Step 7
Create a new layer and use the Rectangular Marquee tool to create a square. Fill the square with black and then apply a 30-500mm Lens Flare (Filter > Render > Lens Flare). Get the Flare as central as you can, so all the circles within the Flare line up.

Step 8
Set the "Lens Flare" Layer Blending Mode to Screen and boost the Levels to over Saturate it with light. Adjust the Hue/Saturation until blue.


Step 9
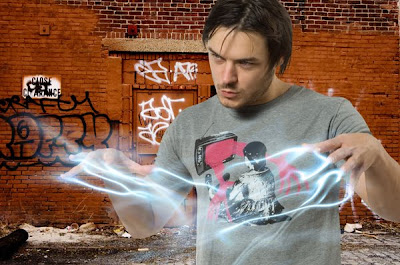
Now we’re going to distort the Flare beyond recognition. Hit it with the Wave Filter (Filters > Distort > Wave). There really is no precise way of getting the desired effects here so I’ve screen-shot a few variations. The best way I’ve found so far is to duplicate your Flare, set-up the Wave filter as in the screens and apply. Then move the Flare around the canvas and re-apply (Command + F). Repeat 6-7 times. If it doesn’t go the way you want it just Command + Z, move, and re-hit the Wave. You should eventually end up with something like this.


Step 10
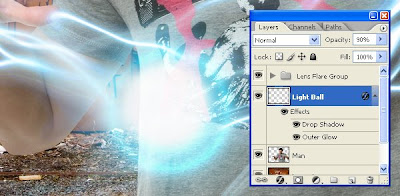
I cleaned up the "Wave" layers with a soft-edged Eraser as there was some undesired overspill. Then on a new layer, create a white Circle. Apply a Gaussian Blur to the Circle and then add a Drop Shadow and an Outer Glow. Finally take the Layer Opacity down to 90%.
 Finished effect
Step 11
If you’re still not satisfied with the "Wave" layers (as I’m not), then tackle them with the Liquify Tool. Take each "Wave" layer that you’re not happy with a gently amend using Bloat and Forward Warp.

Step 12
Add a Channel Mixer Adjustment Layer over the "Man" and "Background" layers. I’ve gone for a blue hue to match the Light effects. At this stage it’s too strong for the man and not strong enough for the background. Command-click the "Man" layer thumbnail to make a selection, then select the "Channel Mixer" Layer mask thumbnail and Fill with 15% Black.


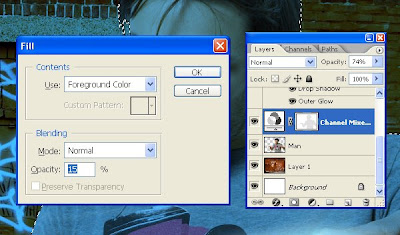
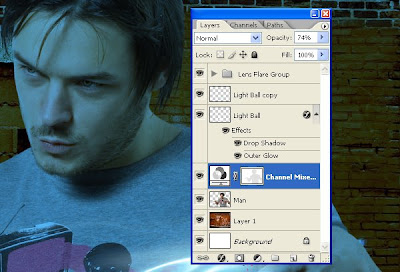 Here’s how my layer hierarchy is currently looking.
Step 13
Create a Hue/Saturation Adjustment Layer between the "Man" and "Background" layers to equalize the saturation of the Background and the Man. Next, duplicate the "Background" layer and adjust the Levels to make it darker. Finally, add a layer mask to the duplicate "Background" and hide the middle of the dark "Background" layer to reveal the layer underneath. Pick a massive soft-edged brush to do this.

Step 14
This is where it starts to get fiddly so, strap in! Turn the Channel Mixer Adjustment layer visibility off for this. I want to eliminate the shadow under the neck so first duplicate the "Man" layer. Next, use the Clone Tool to clone out the areas of shadow that hit the torso of the shirt.

Now using the Lasso Tool, select an area of the neckline that isn’t covered by shadow. Copy and paste it onto a new layer, then use the Warp Tool to fit it with the neck that’s already there. Apply a Layer Mask to it and mask out the areas that overlap the hem of the shirt.

Apply a minimal Smart Sharpen as shown below.

Select the "Man copy" layer and use the Dodge Tool (Set to Midtones with an exposure of around 15%) with a small soft-edged brush, to lessen the impact of the shadow on the neck under the chin.
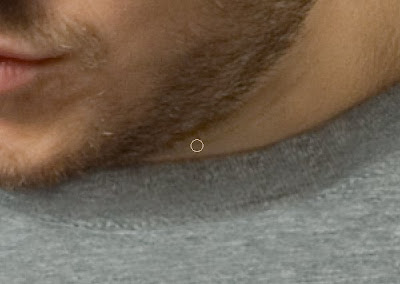
Use the Dodge Tool to lessen shadows that conflict with the light source. Think about where shadows would fall if that light source existed. At this stage you don’t need to go crazy as we’ll be working more on this in a less destructive way.
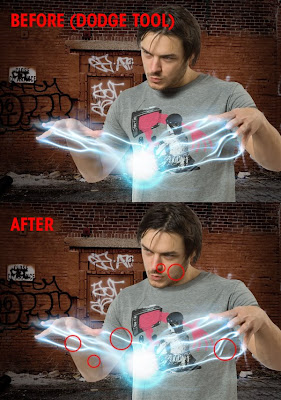
Use the Burn Tool to lessen the highlights that conflict with the light source. You’ll need to mix it up with the Exposure set to both Highlight and Midtones with an exposure set to around 15%. If the area of highlight has some white or close to white pixels, then it may benefit to run your brush over the area with the Highlight exposure set before you reapply the burn tool with the Midtone exposure set. You won’t need to do this on darker pixels.
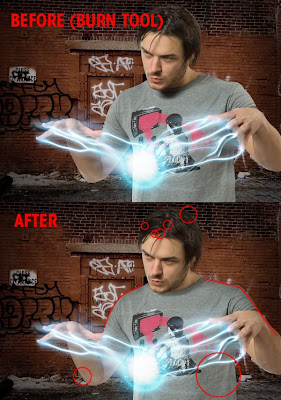
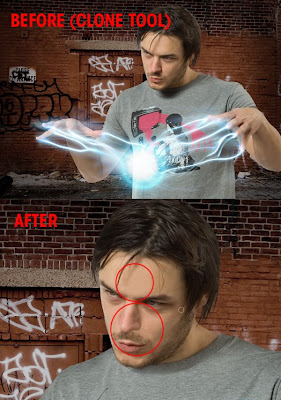
Finally we need to do some cloning. This can be a very involving process depending on the level of detail you need to retain. In this instance, you’ll need to use the Clone Tool set to varying exposures and the Burn Tool.
Clone the mustache hair using the mustache parts that are free from shadow as a start point. This will require a small soft-edged Paintbrush, keep changing your source point after each short stroke. Finally use the Burn Tool set to Shadows with an exposure of 18%, take a 2 pixel brush and burn random hairs to give as much depth as on the other side of the ‘stache.
To deal with the shadow on the nostril and the skin below the nostril you’ll need a steady hand. Select the Clone Tool and use a small soft-edged brush to clone in some skin from the cheek. Go up to the nostril edge thinning the crease, but not eliminating it. Then reduce the Clone Tool opacity and go over the nostril curve effectively reducing its darkness.
Step 15
Add a Curves Adjustment layer to the edited "Man" layer, click the Use Previous Layer to Create a Clipping Mask box. Set up as shown below to boost highlights and make a lighter exposure. Add another Curves layer to darken the image and boost shadows. Give both of these Adjustment layers a hide all Layer Mask.


Step 16
Next we begin painting with light. Take the "Curves_highlights" layer first and select it’s layer Mask thumbnail to work on the Mask. Take a soft-edged Paintbrush and set the Opacity to around 20-30% and begin painting in light. Going over areas more than once to build highlights is essential, and in many areas you’ll need to spot mask areas off using the Lasso tool.

Do the intricate details zoomed in to 200%, you may need a tiny Paintbrush (around 1-5 pixels to get really detailed). Lower the opacity of the brush to blend in areas you highlight and really up the opacity to get the shiny bits. Zoom out at regular intervals to see how it looks. Anything you’ve overdone can be pulled back by loading the brush with black instead of white.

Use the same techniques on the darker Curves Adjustment layer. Build up white areas on your black mask to reveal areas of shadow. This is a time consuming process and can take hours when done with the level of detail and realism required for a professional job. The beauty of this technique is that it’s infinitely adjustable without damaging pixel information. At this stage, it looks like I’ve overdone the highlights so I can simply reduce the highlight Curve Adjustment layers Opacity.

Step 17
We’re going to be doing some destructive editing now so duplicate the "Man" layer. We want to work on the layer that is directly below the Curves Adjustment layers so select that and place the duplicate directly underneath it.
Using the Dodge and the Burn Tools it’s time to really exaggerate the highlights and shadows. I’ve used a variety of Paintbrush sizes, the full range of Highlights, Midtones, Shadows and at varying Exposures from between 5-100%. This isn’t an exact science a lot of it is trial and error, don’t forget to spot mask areas off using the lasso tool. If you overdo something then you may need to revert back to your saved "Man" layer.

I’ve slightly overdone it so I’m going to reduce the layer opacity to about 80% to show the untouched Man layer underneath.

Step 18
To further tie the ball of light into the image we need to add areas of soft glow. Take a big soft-edged Paintbrush and load it with white. Turn the brush Opacity down to 20%. Create a layer below the "Man" layer and add some ambient touches to behind the hands, shoulders, and such.

Create another layer just above the "Man" layer (below the "Adjustment" layers) and use the "Man" layer as a Mask (Command + Alt + G). Paint in some more glow behind the ball of light and extend a little up to the face. Build up behind the ball of light a fair bit.

Finally, create a layer just below the "Channel Mixer Adjustment" layer and paint some glow over the left arm.

Step 19
Now would be a good time to add anything to the special effect. I’ve added these stars that I got from istockphoto here. I adjusted the Hue/Saturation to turn them blue and changed the Layer Blending mode to Screen. I’ve also tweaked the "Channel Mixer Adjustment" layer to get a little more green into the image and added another "Channel Mixer Adjustment" layer to the "Man" (using the "Man" layer as a Mask) to add a touch more warmth to the skin tones.

Step 20
Flatten the image and run a Smart Sharpen filter.

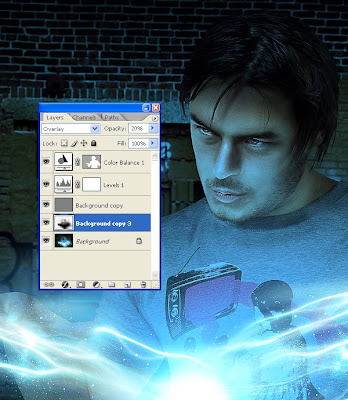
Duplicate the background layer and set the Layer Blending mode to Overlay. Zoom in to 100% and go to Filter > Other > High Pass. Set up and OK it.

Add a Levels Adjustment Layer

Then add a Color Balance Adjustment Layer to give more warmth to the skin. Mask the background off so that the brickwork isn’t too red.
Step 21
And to finish... Duplicate the "Background" layer and invert (Command + I). Adjust the Levels to increase contrast.

Add a Gaussian Blur.

Finally change the Layer Blending mode to Overlay and set the Layer Opacity to 20%.

The End
That’s it! Be as thorough as you can with the Dodging, Burning, and light painting. The more hours you put in, the better the result will be. The majority of the techniques are transferable as well, so if you’re not excited about the fantasy element and just want to create mood for your portraits, then you can use this tutorial as a starting point and adapt the method to fit the result you're after.
The final image is below. You can view the large version here.

Thursday, April 16, 2009 | 1 Comments


